Procreate Brush Usage
For Download and Install instructions, click here.
Using brush-on style Geometric brushes like these is not the same as using normal brushes. Our brush-on style brushes need to be used correctly, or you could find issues with reduced quality and overall usefulness.
How to use for best results / Geometric Brush tips
Recommended canvas size
The recommended canvas size for these brushes is at minimum 4000 x 4000pixels This is because using these brushes at smaller scale can vastly decrease the quality of them. You will notice when you reduce the size of any of the brushes, it can affect quality. Read below for ways to counteract this.
*Tip! It is always better to start a new layer before using the brushes. This makes designs much easier to move around, manipulate, warp or erase.
Resizing Brushes
Geometric brushes are not the same as your usual Procreate brushes. You may find that when you reduce the size of a geometric brush, it reduces the quality - sometimes significantly. Sometimes it is just not as straightforward to use the usual sliding scale to adjust the size of a geometric brush. There's a few ways to counteract this. Number 1, increase the size of your canvas. This does reduce the number of layers you're allowed, but 4000x4000 will still give you around 35 layers to play with. If adjusting the canvas size isn't appropriate, there are a few settings you can play with that will help reduce the brush sizes without affecting quality too much.
The main point you should remember is that any type of brush size reduction will reduce the brush quality. So the bigger it is, the better the quality of the brush.
There are three main settings that will help you. The main one is the 'Scale' setting, which you can find in the 'Grain Menu.' Here:

Increasing the scale will make the design larger within the confines of the brush tip size. To bring the design back into proportion whilst keeping the quality, exit the settings and adjust the brush size in the usual way (with the slider on the left.) You may need to go between these two settings to find the combination that works.
Adjusting the maximum size setting in the 'Properties' menu below will enable you to correct the proportions to your liking. You can mainly work with the 'Maximum size' setting to get the correct sizing you are after:
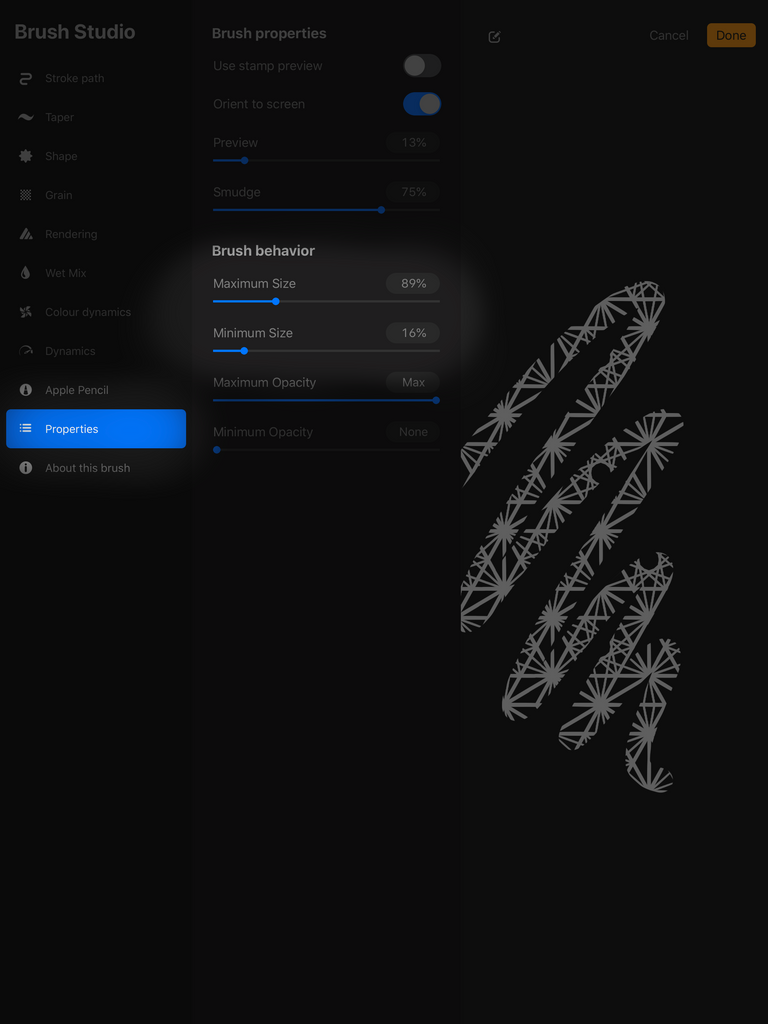
You may need to go between the two settings to find the size combination that works whilst keeping the quality from reducing.
Why some brushes appear 'stretched' and how to fix it.
*** OCTOBER 2021 EDIT: An update to fix this is in progress - I finally found a way to get around this really annoying Procreate restriction! All new brush sets will appear unstretched, The Geometrica brush set will be edited and re-sent to anyone who bought it in the near future. ***
You will have noticed that some designs look slightly stretched. Unfortunately this is completely unavoidable within Procreate but very fixable. The reason? To create brushes you need to make a perfectly square stamp as a base image - this is not possible with original designs made on an isometric grid (this is basically a grid made of hexagons fitting together), you cannot fit a 6 sided hexagon into a perfect square without needing to squash it slightly:

If the original design was made with a square grid, they will not appear stretched.
The main way to fix this is to use the brush on its own layer, and select the area to adjust the sizings. Here is a short video on how to do a quick fix for stretched brushes:
Don’t forget to add a new layer before using the brush.
I realise this isn’t ideal, but it is currently the only way these specific designs can be created as brushes (in Procreate), so it’s either this, or nothing at all. Clip Studio Paint app has a feature that prevents this and corrects the brush - so you could always scrap Procreate and download Clip Studio... (If you are like me, I much prefer Procreate though.)
Tip! Make sure your canvas is straight before applying the brushes. A canvas that is on an angle can distort the design.
Inverting Brushes
Updated:
If you have recently updated Procreate and you are wondering how to invert brushes, here is the answer:
For 'brush-on' style brushes:

For stamp style brushes, you will need to be in the 'Shape' menu instead of 'Grain':

Please contact us if you need help with anything, we will be happy to assist you. DM on instagram, Email us, or use the chat feature on the website. We're usually pretty quick to respond.
Please contact us if you need help with anything, we will be happy to assist you. DM on instagram, Email us, or use the chat feature on the website. We're usually pretty quick to respond.